Posterior optic buttonholing (POBH) is a well-controlled and safe surgical procedure that provides a better alternative to standard in-the-bag placement of a sharp-edged intraocular lens (IOL). It has a steep learning curve, even in the hands of an experienced, well-informed surgeon. The procedure permanently eradicates retro-optical PCO and significantly reduces fibrosis, especially when combined with anterior capsule polishing. Its efficacy is independent of IOL optic material or edge profile. A video and podcast are also available on this technique.
PCO formation and elimination
Placing the IOL inside of the capsular bag potentially allows lens epithelial cells (LECs) to invade the retro-optical space and proliferate. This can cause vision-disturbing posterior capsule opacification (PCO), which frequently requires YAG-laser capsulotomy. The barrier effect of a sharp posterior optic edge is often only transient in spite of a proper circumferential rhexis-optic overlap.
After three to five years, Soemmering´s ring formation tends to reverse a previously formed capsular bend. This permits previously dormant LECs to migrate and access the retro-optical space.1 In my own prospective comparison of otherwise identical hydrophobic acrylic IOLs, the sharp-edged style showed continuously increasing PCO rates, which finally caught up with that of the round-edged style and ended up with the same poor rates after six-and-a-half to seven years (unpublished data). After 10 years, even an IOL thought to provide the best PCO inhibition exhibited a YAG capsulotomy rate as high as 42 percent.2 Sharp optic edges may cause significant dysphotopsia.3 Placing an IOL in the bag also allows the vitreous body to shift anteriorly, potentially leading to retinal traction and increasing the risk of retinal detachment.4
However, with POBH, the loops of the IOL are positioned in the capsular bag fornix, while the optic is buttoned in through a posterior capsulorhexis opening (Schematic 1). This eliminates retro-optical LEC ingrowth and significantly reduces anterior capsule fibrosis. POBH sandwiches the peripheral posterior capsule between the anterior capsule and the optic. This greatly reduces the area of direct contact between the optic and the anterior capsule and thus the contact-mediated myofibroblastic metaplasia of the anterior LECs.1
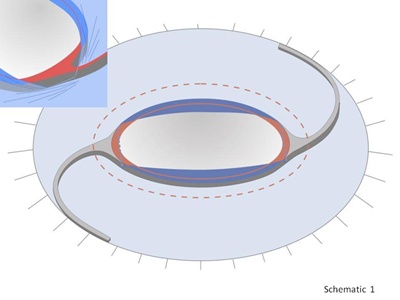
Schematic 1. Click on image to enlarge.
Residual fibrosis emerging mainly from around the haptic junctions where the anterior capsule may still contact the optic (Schematic 1, insert) can be eliminated by anterior capsule polishing (ACP) (Schematic 2, Figures 1-3).5,6 This does not have a negative effect on the efficacy of POBH, unlike with in-the-bag IOLs for which ACP compromises the barrier effect at the optic edge.7 Instead of trying to withhold equatorial LECs from passing the optic edge, POBH simply diverts them anteriorly onto the anterior optic surface. With POBH, LEC ingrowth is limited to the residual peripheral capsule ring. There are no known cases in which LECs have surpassed its edges to grow on the optic surface.
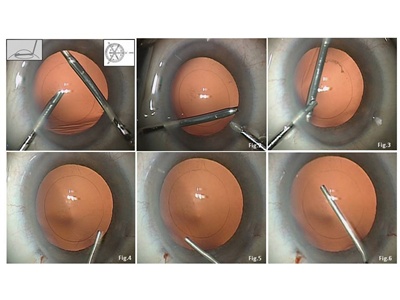
Schematic 2. Click on image to enlarge.
Surgical technique
Sodium hyaluronate 1% (Healon) is my preferred ophthalmic viscoelastic device (OVD) for POBH. Performing POBH involves the following steps.
1. Collapse the capsular bag fornix and create a flat common capsular diaphragm (Schematic 2, Figures 3-6).
Gently exchange the aqueous by injecting OVD through the main incision without expanding the capsular bag. Then settle the anterior capsule leaf onto the posterior capsule and flatten out the capsular diaphragm. Pupillary dilatation may be enhanced by injecting OVD on top of the iris, pushing it backward.
2. Perform a central posterior capsular incision and a centered 4- to 5- mm posterior capsulorhexis (PCR) (Schematic 3, Figures 7-12).
Bend a 30-gauge hypodermic needle bevel up. Enter through the paracentesis, approach the capsule at a flat angle and incise it vertically to the entrance incision (Schematic 3, Figure 7). The conventional technique is to then inject OVD through the incision to inflate Berger´s space and separate the hyaloid from the capsule. Alternatively, I first introduce capsulorhexis forces through the main incision (or alternatively coaxial forceps through the paracentesis), grasp the capsule edge (Schematic 3, Figure 8) and perform rhexis in the first quadrant (Schematic 3, Figure 9). Do not inject OVD through the capsular incision at this stage. Then, and not before, enter with a cannula and gently inject OVD to push back the anterior vitreous surface and separate it from the central posterior capsule (Schematic 3, Figure 10).
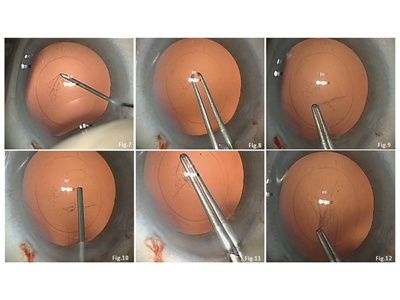
Schematic 3. Click on image to enlarge.
I made this change when I realized that in some cases Berger´s space seems to be lacking, with the hyaloid surface attached to the central posterior capsule. (However, in other patients, Wieger´s attachment line is completely lacking, with a wide preformed space between the posterior capsule and anterior hyaloid.) In cases with the hyaloid centrally attached, puncturing the capsule will inevitably include the hyaloid. When injecting the OVD, it will enter the vitreous body, and the posterior capsulorhexis may then include the hyaloid membrane. Though this rarely happens, I have made the change of first initiating the rhexis and only then viscodissecting the capsule and hyaloid. An additional advantage of this variation is that you can use the standard cannula that is supplied with Healon without the risk of extending the primary slit incision even when the OVD exits as a bolus or an air bubble emerges.
After having separated hyaloid and capsule, alternately inject OVD beneath and above the capsule to keep the capsule diaphragm flat. Continue and finalize the PCR with forceps while using the anterior capsulorhexis edge as a ruler (Schematic 3, Figures 11, 12).
Note that if the posterior capsule turns out to be flaccid (such as in a myope with a large-sized capsular bag or a patient with weak zonules and PEX), it may wrinkle when flattened out. It will then draw aside during attempts to incise and form folds when tearing it. This may make initiating and sizing the PCR rather difficult. When this occurs, implantation of a capsular tension ring before or at any stage during the procedure solves the problem.
3. Detach the anterior vitreous surface from the peripheral posterior capsule (Schematic 4, Figures 13-15).
Enter the cannula through side-port incisions to gently inject OVD beneath the posterior capsule. Place the orifice of the OVD cannula alternately beneath and above the capsule edge to keep the peripheral capsule leaf flat. Ensure circumferential vitreo-capsular detachment by watching the dissection line moving peripherally.
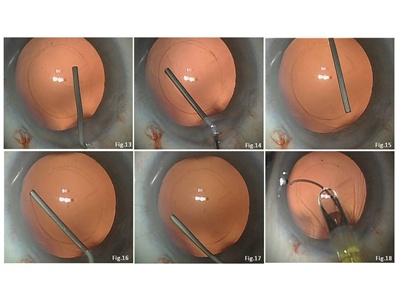
Schematic 4. Click on image to enlarge.
4. Create a capsular pocket through the main incision and implant the IOL (Schematics 4, 5, Figures 16-21).
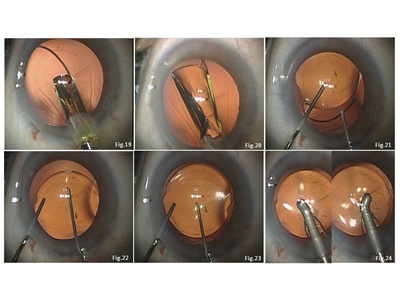
The OVD cannula is inserted between the attached capsule leaves (Schematic 4, Figure 16) and the nasal and nasal-superior/inferior (right/left eye) fornix, which is re-opened by injecting OVD to create a small pocket for placement of the leading IOL loop (Schematic 4, Figure 17). A looped IOL (preferably one of the HOYA iSERT PY-60 IOLs or the iMICS Y-60 H because of their continuous haptic-optic transition) is injected and the leading loop directed into the prepared capsular pocket and unfolded in the eye (Schematic 5, Figures 18-20). A phaco spatula is inserted through a paracentesis and positioned above the optic. The trailing loop is engaged with a Y-spatula and maneuvered through the main incision into the capsular fornix by slightly compressing it and rotating it counterclockwise while gently pushing on the optic with the phaco spatula (Schematic 5, Figure 21).
Schematic 5. Click on image to enlarge.
5. Perform optic entrapment.
With both loops placed in the bag fornix, the optic is buttonholed into the PCR by gently pushing on its midperiphery 90 degrees from the haptic insertion, slightly tilting it and allowing it to slip under the posterior capsule (Schematic 5, Figures 22, 23).
As an optional step, the anterior capsulorhexis may now be secondarily enlarged to reduce the substrate of fibrosis if anterior LEC polishing has not been performed.
6. Remove the OVD.
Avoid bulging of the capsule-lens diaphragm after OVD aspiration. First drain it from the anterior chamber by depressing the posterior incisional lip (to allow hydration of the paracenteses without overinflation) and then using a sleeved coaxial I&A probe (Schematic 5, Figure 24). The incisions are finally rehydrated and then globe-pressurized as usual.
Complications
Puncturing of the vitreous surface
Even with the utmost caution, thismay occasionally occur. In some cases, the anterior vitreous surface may firmly adhere to the central capsule with Berger´s space virtually lacking. Therefore, close attention must be paid to only engage the capsule when incising it with the needle and to only grasp the edge of the capsule with the forceps if the vitreous surface has been punctured. This is also why I do not inject OVD until about one quadrant of the PCR has been completed. Otherwise, the injected OVD may be misdirected beneath the hyaloid membrane into the vitreous body. Incidental vitreous surface puncturing will not lead to vitreous prolapse and will not cause complications.
PCR is too small or decentered
Due to the extreme elasticity of the posterior capsule, a PCR allows for buttoning-in even when smaller than 4 mm. With even a significantly decentered PCR, the bag-positioned loops will still perfectly center the optic. A PCR that is definitely too small or excessively decentered, which rarely occurs, may be adjusted by tangential incising and reshaping after completing viscodissection of the anterior vitreous surface from the capsule.
PCR is too large
This must definitely be avoided, since vitreous may later wade through the gap between the optic and rhexis edge.8 If this should occur, create a tight backup diaphragm by fixating the loops in the sulcus and buttonholing the optic through the anterior capsulorhexis.
Misdirection of the leading loop
The viscoelastic cushion between the capsule and vitreous allows for grasping and repositioning the loop using a hook or forceps without damaging the vitreous surface.
Vitreous prolapse
A large vitreous prolapse would prompt an anterior vitrectomy. Since controlled viscodissection of the peripheral capsule and hyaloid is not feasible, the IOL loops should then be positioned in the sulcus and the optic buttonholed through the anterior capsulorhexis to create a tight alternate diaphragm.
Safety issues
Postoperative anterior chamber flare and pressure rise are potential concerns with POBH. However, the IOL and capsule form a tight mechanical diaphragm that prevents the OVD behind it from prolapsing or dissipating anteriorly. One study I conducted with colleagues found that anterior chamber flare, as measured with a lens flare meter on day one, was even lower than with in-the-bag IOL implantation and was identical thereafter.9 Pressure without medication was also identical when compared intraindividually,10 while avoiding the spikes that can occur after PCR without POBH.11
Other potential complications to watch for are retinal detachment and cystoid macular edema (CME). Among the first consecutive 1,000 POBH cases with follow-up of four to six years, only one retinal detachment (0.1 percent) was reported. This was in an eye with intact hyaloid but axial myopia. A retrospective analysis found that the retinal detachment rate after standard in-the-bag IOL placement was 0.7 percent and 21 percent, depending on the absence or presence of lattice degenerations.3 However, no cases of clinically significant CME were seen after POBH in another study. Macular micro-morphology, as imaged by high-resolution OCT, was the same as after standard in-the-bag IOL implantation.12 This may be explained by the fact that the axial position of the optic, as measured with laser-interferometry, was about 1 mm more posterior after POBH compared with in-the-bag implantation.13 This may stabilize the vitreous body, reducing its movement and retinal traction. The trapped OVD cushion may form a diffusion barrier, preventing cytokines from reaching the macula during the early postoperative period.
The only contraindications to performing POBH are inadequate mydriasis and zonular deficiency.
Additional advantages
POBH offers the additional advantages of refractive and rotational stability and optic-to-iris clearance. After POBH, the optic immediately reaches its final axial position. Final glasses can be prescribed immediately. However, axial shifting is common with in-the-bag IOLs. Buttonholing the IOL excludes postoperative optic rotation independent of haptic geometry, making it ideal for the use of toric IOLs.
The posterior position of the diaphragm avoids iris chafe or synechiae formation. This provides ample space for the placement of an optional add-on IOL.
Conclusions
With proper understanding of the anatomical properties of the lens capsule and hyaloid surface and the interplay between them, and strict adherence to the surgical details outlined above, POBH can be quickly learned by the experienced and dedicated surgeon and become a safe and effective routine procedure.14
References
- Menapace R. Prevention of posterior capsule opacification. In: Krieglstein, GK, Weinreb, RN, eds.Cataract and Refractive Surgery, Essentials in Ophthalmology. New York, N.Y.: Springer; 2004,101-112.
- Vock L, Menapace R, Stifter E, Gergopoulos M, Sacu S, Buehl W. Posterior capsule opacification and neodymium:YAG laser capsulotomy rates with a round-edged silicone and a sharp-edged hydrophobic acrylic intraocular lens 10 years after surgery. J Cataract Refract Surg. 2009;35(3):459-465.
- Olson RJ. Cataract Surgical Problem, Consultation #4. J Cataract Refract Surg. 2005;31(4):653-654.
- Ripandelli G, Coppe AM, Parisi V, et al. Posterior vitreous detachment and retinal detachment after cataract surgery. Ophthalmology. 2007;114(4):692-697.
- Menapace R, Di Nardo S. Aspiration Curette for anterior capsule polishing; laboratory and clinical evaluation. J Cataract Refract Surg. 2006;32(12):1997-2003.
- Sacu S, Menapace R, Wirtitsch M, Buehl W, Rainer G, Findl O. Effect of anterior capsule polishing on fibrotic capsule opacification: three-year results. J Cataract Refract Surg. 2004;30(11):2322-2327.
- Menapace R, Wirtitsch M, Findl O, Buehl W, Kriechbaum K, Sacu S. Effect of anterior capsule polishing on posterior capsular opacification and neodymium-YAG capsulotomy rate: three-year randomized trial. J Cataract Refract Surg. 2005;31(11):2067-2075.
- Menapace R. Posterior capsulorhexis combined with optic buttonholing: an alternative to standard in-the-bag implantation of sharp-edged intraocular lenses? A critical analysis of 1000 consecutive cases. Graefes ArchClin Exp Ophthalmol. 2008;246(6):787-801.
- Stifter E, Menapace R, Luksch A, Neumayer T, Vock L, Sacu S. Objective assessment of intraocular flare after cataract surgery with combined primary posterior capsulorhexis and posterior optic buttonholing in adults. Br J Ophthalmol. 2007;91(11):1481-1484.
- Stifter E, Luksch A, Menapace R. Postoperative course of intraocular pressure after cataract surgery with combined primary posterior capsulorhexis and posterior optic buttonholing. J Cataract Refract Surg. 2007;33(9):1585-1590.
- Stifter E, Menapace R,Kriechbaum K, Luksch A. Posterior optic buttonholing prevents pressure peaks after cataract surgery with primary posterior capsulorhexis. Graefes Arch Clin Exp Ophthalmol. 2010;248(11):1595-1600.
- Stifter E, Menapace R, Neumayer T, Luksch A. Macular morphology after cataract surgery with primary posterior capsulorhexis and posterior optic buttonholing. Am J Ophthalmol. 2008;146(1):15-22.
- Stifter E, Menapace R, Luksch A, Neumayer T, Sacu S. Anterior chamber depth and change of axial intraocular lens position after cataract surgery with primary posterior capsulorhexis and posterior optic buttonholing. J Cataract Refract Surg. 2008;34(5):749-754.
- Menapace R. Routine posterior optic buttonholingfor eradication of posterior capsule opacification in adults: report of 500 consecutive cases. J Cataract Refract Surg. 2006;32(6):929-943.