The links to each individual chapter of the Color Atlas of Gonioscopy are available at the Chapters link, below.
General Guidelines
The eye should be examined carefully with the slit lamp before beginning gonioscopy. One might see a prominent Schwalbe’s line, atrophy of the iris, or evidence of previous inflammation, surgery, or trauma. Such findings can provide valuable information that will guide the gonioscopic examination. An estimation of chamber depth can be obtained at the slit lamp (van Herick et al, 1969), although it should not be substituted for gonioscopic evaluation of the angle. Tonometry should be performed before gonioscopy, as excessive pressure on the eye can artificially lower the intraocular pressure.
The eye should be anesthetized with a topical agent, such as proparacaine. Seat the patient comfortably at the slit lamp with the head pressed firmly against the headband (4‑1). It is important that both the patient and the examiner be comfortable and braced. Align the lateral canthus of the patient’s eye with the canthal marker of the slit lamp (4‑1). This will permit sufficient vertical excursion of the slit lamp to enable the superior and inferior mirrors to be viewed. The examiner’s elbow should rest on the slit-lamp table or a support (4‑2). The magnification of the slit lamp should be set at ×10 to ×25, typically starting at low power first for a more panoramic view. It is often advantageous to use bright illumination first to identify landmarks, and then lower the beam length. For grading the angle, a fairly short and narrow beam of light is preferred to avoid allowing light to enter the pupil. Pupillary constriction will place the iris on stretch and may make a narrow angle appear more open; this phenomenon has been confirmed by ultrasound biomicroscopy (Barkana, 2007). A beam that is 2 to 3 mm long works well. The examiner can adjust the beam width to achieve additional illumination as needed.
It is most important to put the patient at ease during gonioscopy. This becomes much easier with experience—that of the examiner as well as that of the patient. The patient may be disconcerted to be told that a lens will be placed on the eye. Alternatively, the examiner can simply point out that the lens will be close to the eye and may be felt against the lashes. If a patient is having particular difficulty, both lids can be held wide open and the lens placed directly on the cornea without touching the lids. If the examiner moves smoothly and efficiently, the examination will not be unpleasant for either party.

4-1 The patient’s head should be braced firmly against the headband of the slit lamp. The lateral canthus of the eye is lined up with the canthal marker of the slit lamp (arrow).

4-2 The examiner’s elbow must be well supported. For examiners with short arms an elbow rest (arrow) is helpful.
Video clip: Gonioscopy: General Techniques
Goldmann and Similar Lenses
The Goldmann one-mirror lens, the Goldmann three-mirror lens, the Ritch lens, and the Magna View lens are all handled in a similar manner. All have mirrors that are directed at the angle. In addition to the gonioscopic mirror, the Goldmann three-mirror lens has two mirrors through which the peripheral retina can be viewed. As with all slit-lamp goniolenses, the central optic can be used to examine the posterior pole of the fundus. The Goldmann lens provides an outstanding view of the optic disc and fundus.
The concave face of the Goldmann lens should be filled with a methylcellulose coupling fluid before it is applied to the eye. Care should be taken to keep air bubbles out of the solution. Any air bubbles can seriously interfere with examination and photography. Air bubbles can be avoided in a number of ways. The methylcellulose bottle should be stored upside down. If a slow stream of methylcellulose is first squeezed from the bottle onto a tissue, any air trapped in the tip of the bottle will escape (4‑3). The stream is then transferred to the Goldmann lens (4‑4). Alternatively, some examiners remove the top of the dropper to avoid squeezing air into the lens (4‑5).
While the patient is looking up, the examiner brings the inferior edge of the Goldmann lens into contact with the inferior sclera (4‑6). As the patient looks straight ahead, the lens is tilted forward over the cornea (4‑7). A seal forms when the lens is pressed forward, helping to hold it in place. The examination is carried out through the shortest mirror of the three-mirror lens.
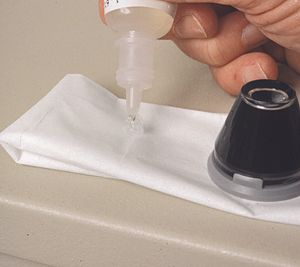
4-3 Begin stream of methylcellulose on to tissue to release the small amount of air that becomes trapped in the tip of the bottle.
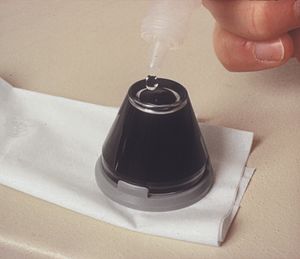
4-4 Maintain pressure on the bottle to keep air from refluxing into the bottle and transfer the stream of methylcellulose to the lens.
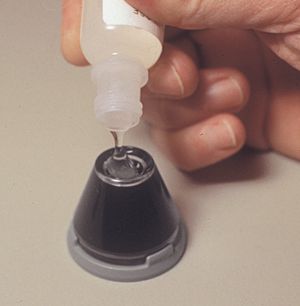
4-5 With the tip removed from the bottle methylcellulose can be poured without bubbles forming.

4-6 The Goldmann lens is brought into contact with the inferior sclera.
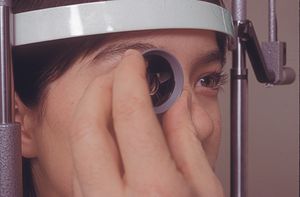
4-7 Goldmann lens tipped up into position.
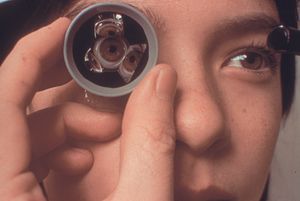
4-8 Goldmann lens held with three fingers. The remaining two fingers are braced against the patient’s face. The other hand is free to control the slit lamp.
Holding the lens with three fingers of one hand, the examiner can rotate the lens easily, leaving the other hand free to operate the slit lamp. The thumb, index, and middle finger are used to hold the lens, and the other two fingers are braced against the patient’s cheek to enable the examiner to keep up with small movements of the head (4‑8). The lens should be held lightly. Excessive pressure can cause reflux of blood into Schlemm’s canal. The suction created by pulling on the lens may make the angle appear artificially deep.
Sometimes, these lenses are difficult to remove because a tight seal has formed between the lens and the eye. Gentle pressure with the index finger on the globe next to the lens will break the seal.
Video Clip: Gonioscopy: Three-Mirror Technique
Four-Mirror Lenses
The Posner, Sussman, and Zeiss lenses are normally used with only the tear film coupling them optically to the cornea. Occasionally, a drop of topical anesthetic, viscous tetracaine, or saline in the concavity of the lens will make the contact easier. The Posner or Zeiss lens is used on a handle that is held between the thumb and forefinger with the remaining three fingers braced against the patient’s face (4‑9). The lens is usually held squarely to the eye, which is the most comfortable position for both examiner and patient (4‑9). Examiners with long arms may prefer to hold the lens in a diamond orientation (4‑10) or to use the Sussman lens. The corners of the four-mirror lens can irritate the eyelids when the lens is held in the diamond configuration. The lens should be applied lightly, just until the air disappears from the corneal interface. The appearance of folds in Descemet’s membrane is an indication that too much pressure is being applied (see 4‑29). It is better to allow intermittent loss of contact with the cornea and the resulting loss of any view, than to allow excessive pressure to alter the exam.
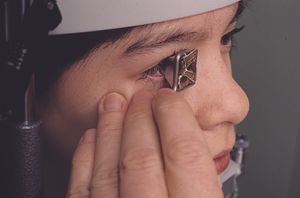
4-9 Zeiss four-mirror lens held between thumb and index finger. The remaining three fingers are used to brace against the patient’s face. The lens is held squarely to the eye.
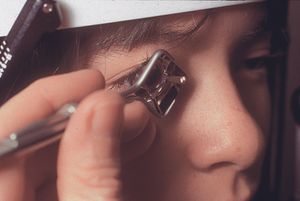
4-10 Zeiss four-mirror lens held in a diamond configuration. This position is more natural for some examiners, but the corners of the lens against the patient’s eyelids can feel uncomfortable.
Video clip: Gonioscopy: Four-Mirror Technique
The View
Slit-lamp gonioscopy is performed through a mirror. The part of the angle that is viewed is 180° away from the mirror that is being used. The examiner must remember that the image is a mirror image. The view, unlike that seen with indirect ophthalmoscopy, is not an inverted mirror image. In slit-lamp gonioscopy, the angle seen in the superior part of the temporal mirror is the superior part of the nasal angle.
Variable illumination is an advantage of slit-lamp gonioscopy. One can use diffuse illumination (4‑11), focal illumination with a broad beam (4‑12), and focal illumination with a narrow beam (4‑13). It is helpful to vary the type of illumination and the orientation of the light. Subtle findings can best be appreciated in this manner. Note that in 4‑11 to 4‑13, the switch from a diffuse beam to a slit beam brought the solitary iris process into view and allowed the corneal wedge (as described below) to be seen.

4-11 Superior angle viewed with the slit-lamp beam fully open.
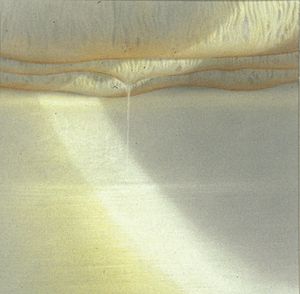
4-12 Same angle as shown in 4‑11 but with the slit-lamp beam narrowed into a broad beam. The contour of the iris becomes more defined. Note that a solitary iris process is now appreciated.
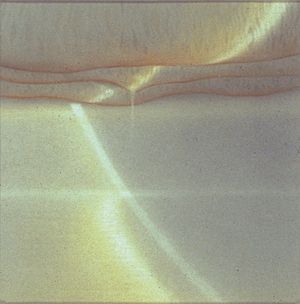
4-13 Same angle as shown in 4‑11 and 4‑12. With narrow-beam focal illumination the iris process is seen clearly and the corneal wedge is well visualized.
By using a thin slit of light, inclined from the angle of the oculars, two separate corneal reflections are perceived—one on the inner aspect of the cornea and one on the outer. In addition to the inner and outer cornea, the narrow beam illuminates the interface between the cornea and the face of the opaque sclera (4‑14). These reflections form a wedge-shaped line termed the “corneal wedge” (4‑15). The lines of the corneal wedge intersect at Schwalbe’s line. By pointing to Schwalbe’s line, the corneal wedge locates the anterior border of the trabecular meshwork. This wedge can have a variable appearance, depending on the anatomy of the cornea and sclera (4‑16 to 4‑18). In lightly pigmented angles (4‑19) or in angles with a confusing anatomy (4‑20), the corneal wedge will locate the trabecular meshwork when no other clear landmarks are present.
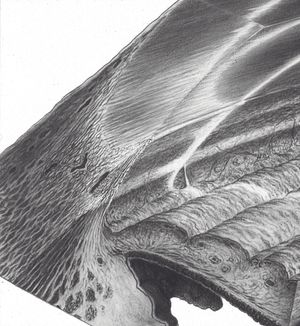
4-14 Drawing showing gonioscopic view in combination with microscopic cross-section. Note the corneal light reflex that is formed as the slit beam illuminates the inner and outer cornea and the interface of clear cornea and opaque sclera. This forms the corneal wedge (arrow).
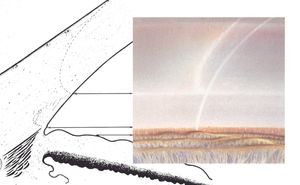
4-15 The corneal wedge points to Schwalbe’s line—the anterior border of the trabecular meshwork. The corneal wedge in this eye has a rounded contour that reflects the rounded interface between cornea and sclera.
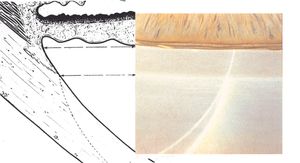
4-16 Narrow, V-shaped, corneal wedge; this is seen more commonly in the superior angle.
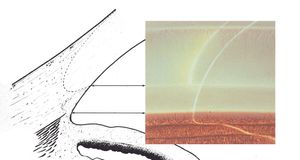
4-17 Rounded, long corneal wedge, the anterior surface of which disappears behind the trabecular meshwork. The vascular pattern of the corneal margin of the limbus is seen.
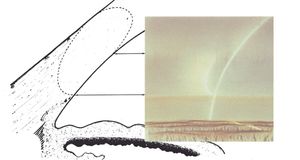
4-18 Only the tip of the corneal wedge is seen in this view because of an arcus senilis in the upper portion of the view.

4-19 The corneal wedge points to Schwalbe’s line in this lightly pigmented angle of an 11-year-old child.

4-20 In this angle the two pigment lines were felt to represent the pigmented trabecular meshwork (line nearest the iris) and a Sampaolesi’s line. The corneal wedge reveals that both of these pigment lines are anterior to Schwalbe’s line, which is at the level of the iris attachment. Synechiae have caused the trabecular meshwork to be covered by the iris. The pigment lines have arisen from chronic contact of the iris with the cornea or from inflammation.
Although initially a challenge, finding the corneal wedge eventually becomes a natural part of an examination. By gently sliding the gonioscopy lens in the direction of the mirror being used, a better view is gained of the cornea and the corneal wedge.
The design of the slit lamp is such that the corneal wedge is best identified in the superior or inferior mirror because it is easiest to generate an inclined vertical slit beam in these mirrors. An inclined horizontal slit beam can be obtained in the nasal and temporal mirrors (4‑21), but this requires considerable manipulation of the slit lamp. It is usually best to examine the inferior angle first (in the superior mirror of a four-mirror lens). The inferior angle is the easiest to examine because it is the most open and most pigmented. One should then proceed clockwise; it is easiest to remember findings by their clock hours if proceeding in a clockwise order. If the corneal wedge is used to identify the structures of the inferior or superior angle, it is usually sufficient to study the nasal and temporal angles with broad illumination (4‑22). Once one has become oriented to the patient’s anatomy, the remainder of the examination is relatively easy. In patients with convex irides, the approach to the angle is steep, which makes examination difficult. The patient should be instructed to look slightly into the examining mirror. This will allow the examiner to look over the iris and into the angle (4‑23 and 4‑24). The examiner must not press while the patient’s gaze is shifted towards a mirror because this can make the angle appear more narrow than it is. If a patient is using cholinergic drops, he or she may have a steep approach to the angle due to pharmacologically induced anterior movement of the lens and iris. If the angle is not capable of closure, anticholinergic drops can be given to deepen the central chamber and improve the view. This is helpful in laser trabeculoplasty, although it must be remembered that dilating a glaucomatous eye can cause an increase in intraocular pressure, especially if the patient is using a cholinergic agent, such as pilocarpine (Shaw and Lewis, 1986).
Most examiners use gonioscopy to evaluate the trabecular meshwork, but the examination should include attention to the iris and cornea. In the dilated eye the gonioscope can be used to examine the ciliary body.
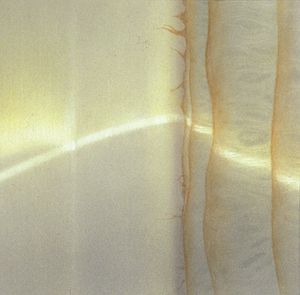
4-21 The lateral angle viewed with an inclined beam. Obtaining an inclined beam in the lateral mirrors is time-consuming and generally not necessary.
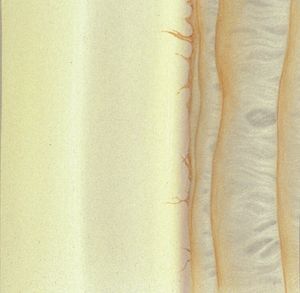
4-22 Same lateral angle as shown in 4‑21 seen with the slit-lamp beam fully open.
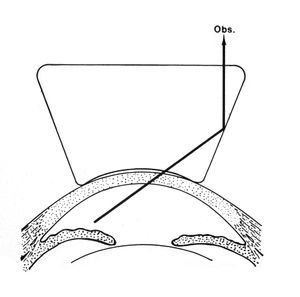
4-23 Iris bombé makes a direct view of the angle difficult. The forward bowing of the iris blocks the observer’s (Obs.) view of the angle.
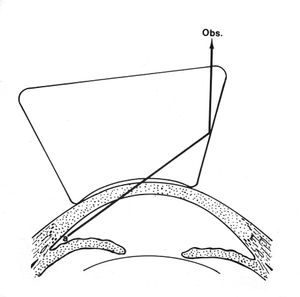
4-24 If the patient’s gaze is turned towards the examining mirror or the lens is shifted towards the angle being examined, it is possible to look over the iris and into the angle (a).
Video clips:
Indentation Gonioscopy
In 1966 Forbes described using the Zeiss four-mirror lens to distinguish between angle closure due to synechiae and appositional closure (Forbes, 1966). An eye with appositional angle closure would be expected to do well after surgical iridectomy or laser iridotomy, whereas an eye with extensive synechiae would probably require surgery. Forbes noted that direct pressure on the cornea from the Zeiss lens caused aqueous to be pushed into the angle (4‑25). This deepened appositionally closed angles, allowing the examiner to see the trabecular meshwork (4‑26 to 4‑29). Angles closed by synechiae either would not open with indentation or would open only partially, with synechiae tethered to the cornea or trabecular meshwork (4‑30 to 4‑33). For angles that were especially narrow Forbes suggested offsetting the lens a few millimeters in the direction of the mirror being used (away from the area being studied). It is usually sufficient to apply direct pressure perpendicular to the cornea. Although some distortion is unavoidable in indentation gonioscopy due to the folds in Descemet’s membrane (see 4‑29), this should not preclude an adequate view. At very high intraocular pressures, indentation is quite difficult and is minimally effective.
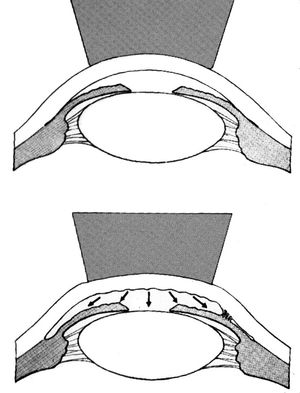
4-25 Indentation with Zeiss four-mirror lens causes deepening of the anterior chamber, which opens areas of appositional angle closure or exposes synechiae. (Reprinted with permission. Arch Ophthalmol. 1966;76:488–492. Copyright © 1966, American Medical Association. All Rights Reserved.)
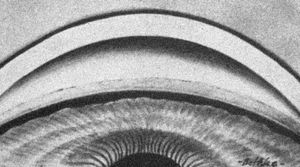
4‑26, 4‑27 Top illustration (4‑26) is of gonioscopy without indentation showing angle closure. Bottom illustration (4‑27) is of same eye with indentation, showing that the angle closure was appositional. (Reprinted with permission. Arch Ophthalmol. 1966;76:488–492.Copyright © 1966, American Medical Association. All Rights Reserved.)
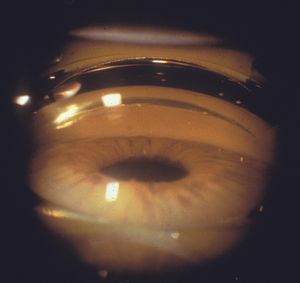
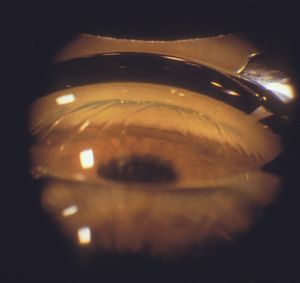
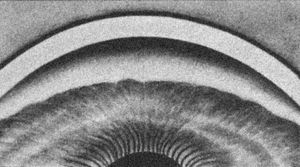
4‑28, 4‑29 The top photograph (4‑28) is a Zeiss four-mirror view of iris bombé in an elderly hyperopic patient. The trabecular meshwork is not visualized. The bottom photograph (4‑29) is of the patient when a Zeiss lens is used to indent the cornea. The trabecular meshwork is visible (arrow). Note the corneal folds.
The deepening of the angle as a result of indentation probably arises from a combination of forces. Aqueous is forced into the angle, which pushes the iris to the posterior (Forbes, 1966). The bending of the cornea also results in mechanical rotation of the limbus, which gives the examiner a more direct view of the angle (Palmberg, 1989).
Indentation gonioscopy is effective with lenses such as the Zeiss, Posner, Sussman, and Allen-Thorpe. These lenses all have areas of contact that are smaller than the cornea. Lenses with large areas of contact, such as the Goldmann and Koeppe lenses, may make the angle shallower with indentation.
Indentation permits the examiner to look deep into the angle recess for iridodialyses, foreign bodies, or cyclodialysis clefts. Closure of a cyclodialysis cleft with an argon laser while using indentation gonioscopy has been described in an eye with a shallow chamber (Partamian, 1985). Additionally, indentation can sometimes be the step that clarifies the angle anatomy. This is particularly true for beginners who are struggling to view the corneal wedge. For example, if a Sampaolesi’s line is present in an eye that is appositionally closed, indentation will reveal the trabecular meshwork. This can prevent the examiner from mistaking the Sampaolesi’s line for the meshwork itself. Similarly, finding the ciliary body face with indentation can help identify an angle as being open in someone who has no trabecular meshwork pigment. Examples of indentation gonioscopy are included on the DVD accompanying this text.
Once mastered, indentation becomes a natural part of the examination. It affords a dynamic view of the relationship of the iris and the corneoscleral angle.
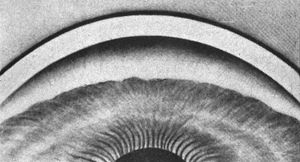
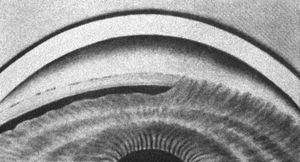
4‑30, 4‑31 Top illustration (4‑30) is of gonioscopy without indentation, showing angle closure. Bottom illustration (4‑31) is of the same eye with indentation, showing a broad synechia. (Reprinted with permission. Arch Ophthalmol. 1966;76:488–492.Copyright © 1966, American Medical Association. All Rights Reserved.)
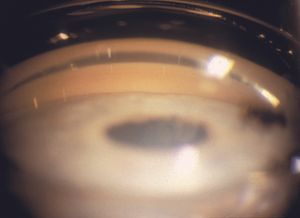
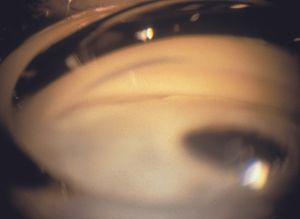
4‑32, 4‑33 The top illustration (4‑32) shows an eye with appositional angle closure. No trabecular meshwork is visible. With indentation gonioscopy (4‑33) parts of the trabecular meshwork are visualized (small arrow) but there is a broad peripheral anterior synechia (large arrow), which precludes visualization of the remainder of the trabecular meshwork.
Video clips:
Cleaning of Gonioscopic Lenses
Human immunodeficiency virus and other infectious agents have been isolated in the epithelium of the eye and in tears. Although transmission of human immunodeficiency virus has not been documented in ophthalmic examinations, it is important to disinfect lenses after each use (American Academy of Ophthalmology, 1989, 2002). The human immunodeficiency virus is sensitive to heat and to a variety of commonly used disinfectants, such as alcohol, glutaraldehyde, sodium hypochlorite (household bleach), formalin, and phenol (Conte, 1986). Unfortunately, many gonioscopic lenses are quite fragile and may be damaged by some of the recommended techniques for disinfection.
In 1988 the American Academy of Ophthalmology, the National Society to Prevent Blindness, and the Contact Lens Association of Ophthalmologists jointly issued guidelines for disinfection. They suggested inverting the contact lens and wiping the surface with an alcohol sponge. For added protection the lens can be inverted and the concave contact area filled with a solution of 1:10 household bleach, which is left for 5 minutes and then rinsed off with water and dried. This method allows cleansing of the outer surface of the lens as well as the contact portion without exposing the anti-reflective coating on the operator surface of the contact lens to the bleach. It is important to rinse to avoid corneal de-epithelialization that might be caused by residual disinfectant solution (American Academy of Ophthalmology, 1989, 2002). Some manufacturers recommend soaking lenses in 2% glutaraldehyde or dilute (1:10) household bleach (Ocular Instruments, Bellevue, Washington). Most lenses can be gas-sterilized and some glass lenses can be autoclaved. With all lenses the manufacturer’s instructions for disinfection should be followed to prevent damage to the lens.