Congratulations! You’ve just treated your patient’s diabetic macular edema or maybe you’ve taken out their dense cataracts.
Now, with a pair of glasses, your patient’s vision will be correctable to 20/20. Remember you’re the one responsible for providing them with a prescription for glasses, so let’s get you prepared.
What Is Refraction?
Refraction is the measurement of the eye’s focusing characteristics and the determinant of a prescription. A prescription has three main components: sphere, cylinder and axis.
There are also different types of refraction:
- Objective (streak): Using a retinoscope to measure a patient’s refraction.
- Subjective (manifest, dry): Using a refractor (also known as a phoroptor) to allow a patient to provide their subjective response about their prescription.
- Cycloplegic (wet): A refraction after a patient has had cycloplegic drops to paralyze their accommodation.

Know Your Equipment
For this tutorial, we will cover manifest refraction.
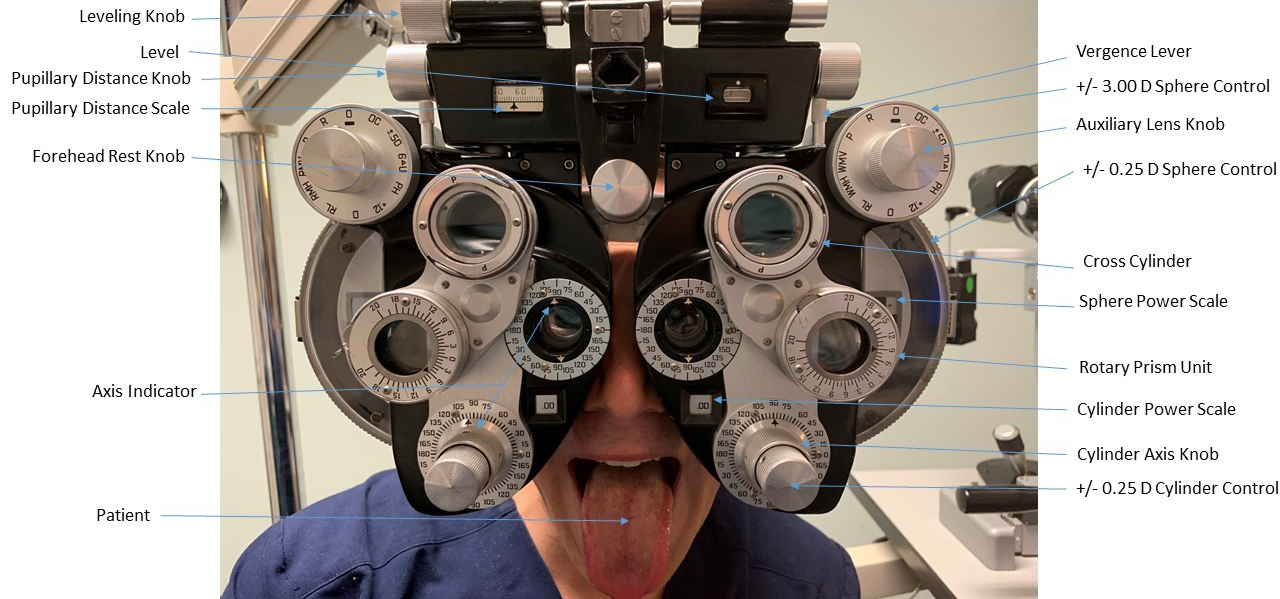
First, know your refractor instrument. In general, minus (divergent) lenses will be in red and plus (convergent) lenses will be in white or black. Familiarize yourself with all of the knobs. Here are the most important:
1. Sphere power control
- When rotated downwards, you add plus sphere.
- When rotated upwards, you add minus (or take away plus).
2. Cylinder power control
- When rotated clockwise, you add plus cylinder.
- When rotated counterclockwise, you take away plus.
3. Cylinder axis knob
- Ophthalmic scale = 1 to 180 degrees. Using this scale, 185 degrees should be noted as 5 degrees.
How to Refract
When you perform a manifest refraction on a patient, occlude the contralateral eye (OC on the auxiliary lens knob) and keep the tested eye open (O on the auxiliary lens knob). The details on how to refract are too complicated to cover in this short article, so please watch this excellent video tutorial from the University of Iowa (vimeo.com/135867809) and the animation below. The animation will help you understand how images are focused on the retina through refraction.
Before actually refracting, it’s important to prepare your patient for the process of refraction. You might say, “I am going to show you a series of two different choices. Please let me know which option is clearer. If they are the same, that is a perfectly good answer.”
Then open the projector to show as many lines as possible and ask the patient to identify the lowest line of letters they can read (this will save you some time). Isolate that line. Then proceed with the four steps of a refraction (see the animation referenced above). Here are some key tips for each step:
1. Spherical power: Always add +0.50 D (diopters) first to decrease the risk of over-minusing the patient (when patients accommodate in the refractor, they will need more myopic lenses, which can lead to eye strain). Make your patients “earn” more minus — they must see a smaller line on the chart with the increased myopic lenses.
2. Cylinder axis: First, increase the Snellen acuity one line. The larger letters will make it easier for the patient to help you find the correct axis.
3. Cylinder power: Go back down a line on the chart to the smallest line the patient can read. Key step: When you add +0.50 D of cylinder power (two clicks clockwise, or right), you must take away 0.25 D of sphere (one click UP). This maintains the spherical equivalent. Therefore, if you take away 0.50 D of cylinder (two clicks counterclockwise, or left), you must add 0.25 D of sphere (one click DOWN), and vice versa (see animation). Think: up the plus cylinder, move the sphere wheel up; down the plus cylinder, move the sphere wheel down.
4. Spherical power refinement: For this step, go in 0.25-D increments. At the end, perform the duochrome test and ask the patient if the letters are clearer on the red or the green side. Remember it with these letters, “RAM-GAP,” which stands for “if the Red is clearer, Add Minus; if the Green is better, Add Plus.”
Here are some general tips to get the best refraction for your patient:
- Work with the smallest line that the patient can read.
- “Which do you see better, #1 or #2?” Go all the way up to #10 (#3 or #4, #5 or #6, etc.) and then back to #1 versus #2.
- If the patient pauses, show them the two options again, providing for two seconds on each option.
Refraction requires practice, so practice often on cooperative patients at first. You can do this. You will do this. Go forth and refract.
* * *
 About the author:
 Evan Silverstein, MD, is an assistant professor of ophthalmology and associate resident program director at Virginia Commonwealth University in Richmond, Va.