By Stephen C. Gieser, MD, MPH
Download PDF
Earlier this year, with the surging pandemic, people around the world scrambled to learn videoconferencing. In doing so, they pushed this form of communication into the mainstream for professional and personal use. Ophthalmologists are now using videoconferencing for telemedicine, business meetings, and scientific presentations, as well as for staying in touch with far-flung family.
Create a Zoom room. Sure, you can participate in a videoconference from your desk using a smartphone or a standard laptop; but with a few simple upgrades, you can create a Zoom room and look and sound like a polished communications professional.
Start with a quiet space. Find a quiet room in which the door can be closed to control external sound. If the windows can be covered, the lighting can be precisely controlled on the subject. You will need a setup area of about 10 feet by 10 feet.
Five simple steps. Each of the upgrades outlined below will improve the appearance or sound of the speaker. You can take one step at a time, or you can, as I did, plunge into the project and buy everything at once. (However, because of the millions of people working from home, some of this equipment may be backordered or out of stock.)
1. Upgrade Your Webcam
Laptops have notoriously poor built-in webcams. The built-in cameras of most Apple MacBooks, for example, shoot a grainy 780p.
Buy a high-definition external webcam. I read a lot of reviews, and the most frequently mentioned camera was the Logitech c920, but there are many different makes from which to choose. I bought a Logitech c922 because that was the only model I could find in stock. This simple “plug-and-play” device produced a dramatic improvement in image quality.
Cost. $115.
2. Improve Your Lighting
The better the lighting, the better the appearance of your video.
Watch for shadows. Desk lights or overhead lights will give the face unbecoming shadows.
The basic single-light approach. A single LED ring light on a tripod stand provides good illumination, and it costs between $25 and $100. Social media influencers have used this type of light for years.
Three-point lighting works best. Lighting quality increases when the light comes from different angles. Professional videographers often use three-point lighting: a key light, fill light, and back light.
The key light is the brightest light. The key light is placed in front of the subject about 45 degrees off center. However, if used alone, a key light will create shadows on one side of the subject’s face.
The fill light removes the shadows. Adding a fill light, placed 45 degrees off center on the opposite side of the key light, will remove the shadows. The fill light is a softer light, usually about 50% the intensity of the key light. With these two lights the subject will be brightly lit but will appear two-dimensional. To achieve the best effect, you should also use a back light.
The back light makes the subject pop off the backdrop. The back light illuminates the edge of the subject. This creates greater depth, which produces three-dimensionality. It is placed behind the subject, about 45 degrees off center on the same side of the key light. The backlight must shine down so that it hits the back of the subject’s shoulders and head.
You will need three tripods. These should have adjustable extensions so that you can place each one at the proper height, and will cost about $20 each. Tripods for lights use a 1/4-inch screw size. (Camera tripods usually work with a 3/8-16 screw, and inexpensive 3/8-to-1/4 adapters are available online.)
Light options. Incandescent, fluorescent, and LED lights are available. I like LED lights because they do not generate heat and can be adjusted for intensity and for color. The color can look warm (3,200 K) or cold blue-white (5,600 K), and the color for the subject’s face and the backdrop can be adjusted. I bought three small lights from Lumecube ($60 each). They are adequate, but next time I will buy larger lights.
Cost. $240. ($180 for the lights; $60 for the tripods.)
 |
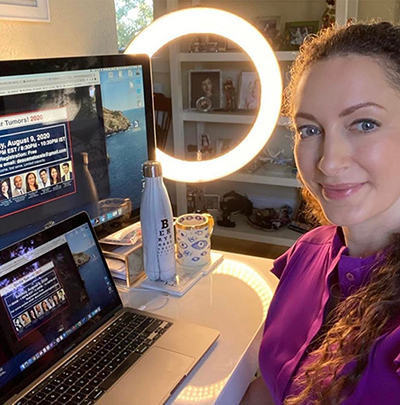
THE SINGLE-LIGHT APPROACH. If you’re using a single light, the best effect is with a ring light, as used by Jesse L. Berry, MD, an ocular oncologist and Instagram enthusiast ( @_moda_md). This type of light gives even lighting across the face, and you do not need to place your camera in the middle of the ring in order to achieve the effect. When videoconferencing Dr. Berry often finds it useful to use two monitors, using one to view the video stream and the other to reference her notes.
|
3. Use a Green Screen
I will admit to spying on my colleagues during Zoom meetings, enlarging the image to see what their office looks like. So be mindful of what is visible.
Hide background clutter. In order to hide the room, many videoconferencing programs let you upload a photo to use as a virtual background. For this to work well, you should use a plain, uniformly colored wall as a backdrop. The experts use a green screen. Why green? Software can easily distinguish between bright green and skin tones, allowing programs to erase your background and replace that area with a photo or video (think of the television weather presenters). For it to work well, the green screen should not have wrinkles or shadows. I use a portable, retractable green screen.
Cost. $125.
Seven Performance Tips for Video Conferencing
Whatever equipment you are using, you will want to keep these pointers in mind.
Tip 1: Make sure your camera is at eye level. A common mistake is to use a low camera angle, which can give you a double chin.
Tip 2: Look directly at your camera. If you look at the image on your screen, you will be casting your eyes downward, and that gives you a distracted look.
Tip 3: Avoid wearing certain colors. If you are in front of a green screen, don’t wear anything green! Also avoid wearing too much white, as that can affect the camera’s white balance.
Tip 4: Avoid shiny objects. Webcams can have trouble with shiny objects, such as jewelry and eyeglasses.
Tip 5. Check your upload speed. Your upload speed, rather than your download speed, is usually the limiting factor in sharing high-quality video with the other videoconference participants. An inadequate upload speed can degrade the quality of the video stream that you are sending to others; an inadequate download speed can degrade what you see of them. If you are worried about interruptions to either video stream, you can check your upload and download speeds using free websites, such as speedtest.net.
Tip 6: Have a backup hotspot. In case your internet connection is unstable during the call, be prepared to use your cellphone as a hotspot.
Tip 7: Do a trial run. Most important tip: If you are giving an important presentation, check all of your equipment the night before. Do a trial Zoom meeting to inspect your wardrobe (see Tips 3 and 4) and lighting. |
4. Upgrade Your Microphone
An external webcam usually contains a microphone of a higher quality than that built into your laptop. But I recommend buying a high-quality cardioid microphone that plugs into a USB port, such as those from Blue. I chose the Blue Yeti, partly because it was available and partly because it looks cool. The increase in voice quality makes me sound like a radio announcer.
Cost. $130.
5. Add a High-Def Monitor
Tired of looking at tiny faces on a Zoom meeting with your laptop? Hook up a large monitor. You will find it helpful to use both the laptop screen and the monitor. For example, some videoconferencing programs have a dual-screen option. This would allow you to use your laptop for speaker view, which might include your notes, and the large monitor for the audience view. I splurged and bought a HP Z27 4K monitor (Hewlett-Packard). It is gorgeous; but with the ultra-high definition, I now long for a better webcam.
Cost. $540.
Smile, You’re On Camera
When I started, I knew nothing about video photography, lighting techniques, or fancy backgrounds. With a little research I created a Zoom room, spending $540 for a monitor and $610 for everything else. Videoconferencing will outlast the pandemic, and now I am ready to go live.
___________________________
Dr. Gieser is a glaucoma specialist at the Wheaton Eye Clinic in suburban Chicago. Financial disclosures: None.
Zoom Room Follow-Up
Since writing the Zoom room tips that were published in October’s EyeNet, I made three further equipment upgrades—not all of which were worth the money.
1. Webcam upgrade. I upgraded to a 4K webcam (Logitech Brio). The picture is fabulous, but I needed a much greater bandwidth to use it. Recommended upload speed for this camera is at least 30 megabits per second (Mbps). There are free websites that can help you to find out what upload speed you have on your connection (see “Tip 5: Check your upload speed,” above). Bottom line: My Logitech c922 webcam was more than sufficient.
2 Lighting upgrade. I replaced my key light and my fill light with larger lights. Larger lights give you less harsh shadow on your face. On front of each light I attached a softbox, which diffuses the light. The net effect was incredible, but I am a bit embarrassed to admit how much I spent. I bought my lights at B&H Photo Video (bhphotovideo.com). Bottom line: Huge upgrade, but beware—the studio lights professionals use can be very expensive.
3 Green screen upgrade. You get a better green screen effect if you can have a few feet of separation between the back of your chair and that back screen. But when I pushed the desk farther away I discovered that the 4.5-foot-wide screen that I had purchased was sometimes too narrow: If the camera was misaligned, the edge of the green screen showed, which spoiled the effect. I bought a 9-foot-wide green screen, and it works much better. Bottom line: It was a worthwhile upgrade.
Green screen tips. Some people have made their own green screen out of fabric or paper. You can even paint a wall with green screen-colored paint. Whatever is used, you don’t want it to be shiny or reflective.
You also should try to prevent shadows on the green screen, as they will disrupt the background image that you are using as a virtual background. To prevent shadows, even lighting of the green screen is important. If you are using a back light, make sure the light doesn’t spill on the green screen. This will cause flares in the background. I taped a piece of cardboard on my back light to stop the light spill.
Shopping for equipment upgrades? Two excellent sources for equipment are B&H Photo Video (bhphotovideo.com) and Adorama (adorama.com). |
 |
|
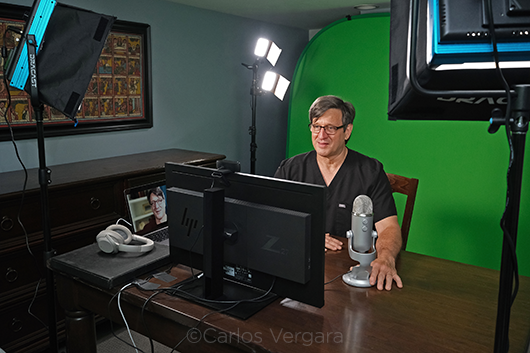
FURTHER UPGRADES. Dr. Gieser’s Zoom room after upgrading the webcam, lighting, and green screen.
|